Getting Started
New to UMLBoard? Then this section is right for you: The chapters on this site will introduce the basic UI concepts of UMLBoard and provide you with everything you need to create impressive diagrams quickly and easily.
Classes and Notes
Creation
Let's start with some basics: To create a new diagram, you have the following options:
- Choose the New Diagram entry from the application's File Menu
- Click the New Diagram option on the Welcome screen or
- Press the Ctrl + N shortcut (Cmd + N on macOS)
After your newly created diagram has opened, click on any space to open up the context menu. Hovering the mouse over a menu item will automatically expand its subitems. Leaving the menu entry will collapse the submenu again. The menu items in the top area let you create new diagram elements, like classes or notes.
By the way, clicking on the root element of a menu group will execute a group-specific default action.
For example, clicking on the + symbol in the diagram context menu is a shortcut for creating a new class.

Tip
If you are more one of these keyboard-wizards, you can also use shortcuts for creating elements:
- Create a new Class: Press Shift + Ctrl + C (Windows/Linux) or Shift + Cmd + C (macOS)
- Create a new Note: Press Shift + Ctrl + N (Windows/Linux) or Shift + Cmd + N (macOS)
The new elements will appear at your current mouse position.
Switching Commands
1.5
Starting from version 1.5, there are now additional menu actions to create classes/interfaces or sticky-notes/plain text right from the start. And it gets even better:
Pressing Shift while hovering your mouse over the root action item lets you switch between the two subcommands and then click to execute them.
Editing
Your newly created class or note will automatically be in edit mode, so you can immediately enter your classes' name or your note's text. Complete the editing by either pressing Enter or clicking somewhere outside of the input field. Pressing Esc will cancel your editing and revert the text to its previous state.
Note
If you're editing a note, pressing Enter will confirm your input and leave the edit mode, while pressing Shift + Enter will add a new line.
To edit a text on your diagram later, whether the diagram's name, the identifier of a class, or a note's content, press the mouse on the text and keep it pressed. You should see a small progress indicator next to your cursor and, after approx three seconds, the edit field should appear. Now start editing the text.
Tip
Beginning from Version 1.4. you can now also double-click on a text to start editing.
Connections
While classes are a fundamental concept in UML, they alone make no system. The genuine power of a software architecture only unfolds when these classes interact. For this, we need to connect them.
Creation
To create a connection or relation between two classes in UMLBoard:
- Choose one of the connection points that appear when you hover the mouse over a classifier.
- Drag the connection point to your target class.
- Releasing the mouse button over your target will open up a connection dialog.
- Select your desired connection type from the dialog - the link between both classes will be established.
Tip
If you recognized that you mixed up your source and target class, don't worry: Just click on the Switch button on top of the connection-dialog to switch the direction of your connection.
Editing
Editing the description of your connection works in the same way as with all other texts: Long-press or double click it and enter your desired text.
Regarding the drawing and placement of your relationships: You don't have to worry about that; UMLBoard will automatically choose the shortest possible connection between two elements:
Additional Notes
- You can also create connections between classes and notes. Simply choose a note as the source/target of your relation and proceed as described above.
- To edit the multiplicity of an association, please have a look at the Multiplicity entry.
- Manually adjusting the connection path is currently not supported but will be available in future versions.
Class Members
Let's now take a quick look at how you can add members to a class and how you can later edit these members. Right-click on a class to open the class-specific context menu. The menu item on the top lets you add new properties, methods, or freeform texts to a class.
properties, methods, or freeform text.
Adding a new property is also the default action when clicking directly on the + symbol, so let's start right there:
Properties/Attributes
Add a new property or attribute by selecting the Add Property menu item, an edit field will become visible, and you can start right away by entering your property's name.
After you've finished entering the name, you can either press Enter or Tab to advance the cursor to the property's type.
To choose your property's type, you can either select an existing entry from the combo box or enter a new one. Your newly entered type will then be added to the list of available standard types, and it will also be available for other properties or methods throughout your whole diagram.
From here, you have to options:
- Pressing Enter will complete your input and close the property editor.
- Pressing Tab instead will confirm your input and add another property to your class. The edit cursor will move right to the new property's name. This approach can be helpful if you want to add a batch of properties at once to your class without interrupting your typing.
Info
This input pattern is something that applies to all member editing:
Pressing Enter at the end of a line will confirm and close your editing, while pressing Tab instead will continue the editing process with a new member.
If you later want to edit the property's name or type again, click on either of them and hold the mouse button down until the input field appears.
Methods
Editing of methods works essentially in the same way as editing attributes, so let's also have a brief on how that's done:
Add a new method to a class through the class-specific context menu (right-click on the classifier element to open it). Analogous to property-editing, an input field will appear where you can enter the method's name.

From here, you have two options:
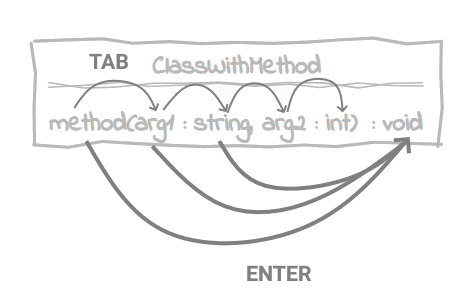
- Press Enter to move directly to the method's return type, skipping all method parameters.
- Press Tab to either start editing the first parameter or create a new one if none exists.
Editing parameters works in the same way: First, enter the name, then press Tab to move to the parameter type. After editing the type, press Enter to finish parameter editing and move on to the return type, or Tab to move to the following parameter/create a new one.
When your cursor is at the method's return type, pressing Enter will complete your edit process, while Tab will create another method and move your cursor one line down.
If you might be confused now, don't worry, it's much less complicated than it might sound here. All you have to remember is:
Pressing Tab creates new elements or steps through existing ones, pressing Enter finishes the current stage of your edititing.
You can cancel your editing any time: Press Esc during parameter editing to revert what you just entered and move your cursor back to the method's name. Press Esc again to cancel all editing.
Note
In contrast to properties, new methods will be added to your class only after you have finished editing. Therefore, canceling the editing of a new method will remove it from your class.
Freeform Text
UML is a very feature-rich specification, and UMLBoard does not implement all parts of it by far. If you need a specific property or method feature that UMLBoard does not yet provide, the freeform text functionality might be a good fit for you. Freeform text can be any text and won't get validated by UMLBoard, so you're free to enter whatever you like.
To add a freeform text, choose the corresponding menu item from a classes' context menu and start typing. As with properties and methods, completing your editing with Enter will confirm and close the edit mode, while pressing Tab will immediately add the subsequent freeform text to your class.
And that's all, congratulations! You just finished your first steps in creating diagrams with UMLBoard, happy drawing!
Tips and Tricks
Moving the Wheel-Menu around
1.9
If an element is located at your diagram's edge, some wheel-menu entries may be rendered out of the visible area. In that case, you can left-click on the wheel menu, hold the mouse button and drag it around like any other element. After placing the wheel menu at the desired location, release the mouse button and continue using the menu as before.